
The ClearWalker comes to life via Arduino and Bluetooth control
June 09, 2017
Blog
[Photo from footage taken by PJ Accetturo] Several years ago, I was shown a device called the Strandbeest, a mechanical walking creature that moves via wind and mechanical power. At first I...
[Photo from footage taken by PJ Accetturo]
Several years ago, I was shown a device called the Strandbeest, a mechanical walking creature that moves via wind and mechanical power. At first I thought that, though interesting, it wasn’t something I would try myself – it was way too complicated. Eventually, though, the allure of this device was too much. I decided to make my own electric motor-powered version. Though my first two attempts were less than successful, after some development, the next two were able to walk. Finally, a few months ago, I decided to take on my most ambitious project yet: a ‘beest standing several feet tall, made out of clear polycarbonate. I call it the ClearWalker.
I’ve outlined my challenges physically building it and getting it to walk in videos here, and here, but since this is Embedded Computing Design, we’ll focus more on the electronics and programming. Besides, there’s a lot to talk about, considering the ClearWalker would implement a series of lights, a head, a tail, and (importantly) would be clear, allowing people to see the internals of the device. Though I’d controlled my last, much smaller ‘beest with standard R/C components, I decided to use an Arduino under Bluetooth control for more flexibility.
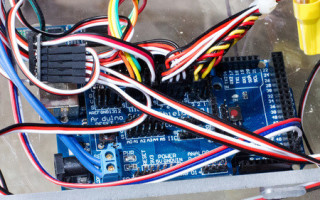
Arduino Mega

[Arduino Mega and sensor shield with a wide variety of I/O connected]
During initial testing, I used an Arduino Uno to allow the fledgling ClearWalker to traverse forwards and backwards, along with a so-called sensor shield (it can be used for much more than just sensors), which allows you to use standard hobby servo connectors instead of plugging individual wires into each Arduino socket. This saved me a lot of frustration and wiring time, and I’d very much recommend using these.
I also switched later to an Arduino Mega (which could also use the sensor shield) to take advantage of its expanded I/O. Though this wasn’t strictly necessary in my case, as things started to get over-populated, I was glad to have a little more “bandwidth” just in case. Besides, the extra set of outputs worked really well for the LED matrix I was using for the eye that required three digital pins as well as power and a ground.
H-bridge PWM relay modules and speed control
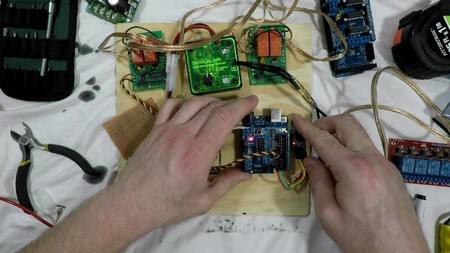
[Wiring coming together. Note the PWM H-bridge relays on the sides.]
Though there are “motor shields” available to control motors with an Arduino, with something this size, I was concerned about the current-carrying capacity. I opted instead to use a PWM-controlled H-bridge module capable of controlling up to 12 amps of current. This clever device is meant to take input from an R/C receiver in R/C PWM (pulse-width modulation) format and turn it into forward/backward/stop outputs. Per my control scheme, I generated these signals from the Arduino instead.
For (manual) motor speed control, I used a this module to supply PWM-regulated power from the rechargeable batteries (8.4V NiCad packs wired in series) into each H-bridge module and thus the motors. It should be noted that this PWM signal is separate from that generated by the Arduino, which is used to control relays, not the motor directly.
Bluetooth control
Instead of buying a separate controller, I purchased an HC-05 Bluetooth module, which transfers serial signals to my development board of choice, an Arduino Mega. The Arduino takes these signals and translates them into a format that can control lighting and movement. Though using this protocol sounds complicated, it’s actually quite a bit simpler than I expected. You can see more about my experience initially setting it up to work with a smartphone app in this writeup. Additionally, I put a “how to” article up on instructables, which goes over how to set up smartphone/Bluetooth control specifically for a Strandbeest style walker, or even a tracked vehicle.
Lighting

[Lights on, standing in water]
An important part of this build was the lighting. For the mouth I used a NeoPixel ring to form a sort of smile, and one of the eyes was formed by a monochrome LED matrix, offsetting a GoPro Hero3 camera lens on the other side. This created a fun, Terminator-like look.
On each of the legs I attached several programmable LED strip segments, joined together by wire and solder. Though it gave me less flexibility, I chained all of the leg LEDs as well as the tail together in such a way as to control them with one output. Instead of allowing them to all act separately, I connecting the first pin of each series of strips to the same data line, producing eight “cloned” legs and a tail. This worked fairly well, but some of the LEDs farther out on each chain were left off at times. I’m not sure if this was due to some degradation of the data, but it didn’t affect the photos or video much. Be sure to check out my post on programmable RGB LED options if you’d like to see more about this style of lighting.
There were definitely some challenges getting the device to work, but I’m extremely pleased with how the build turned out. Though the project is nominally complete, there are a few improvements I’d still like to make – perhaps something like this is never really done!


